Tag: wireless networking

  • Solar Powered Parking Lot WiFi – A Bright Spot in the Middle of a Pandemic

    It seems as though things have been changing from day to day (or maybe hour to hour) over the last several months as we figure out ways to navigate a pandemic. Not many things are immune to the affects of the pandemic, no pun intended, and that includes reliable network access. K12 network engineer’s minds have been spinning as school districts grapple to find new ways to provide network access outside of their buildings.

    A couple of months ago we were tasked with a project to supply internet-only wifi to selected school parking lots. We came up with a pretty good, low cost solution, that we thought would be an ideal fit. We bought the equipment for a PoC, ran tests, and everything worked very well. We planned on using point-to-multipoint radios; one base radio on top of a school, with one or two CPE radios on light polls in the parking lots. These CPE radios not only provided backhaul to the school network via the base radio on the roof, but they also had a client facing radio that could deliver wifi to devices in the parking lot. When the idea was presented to leadership teams there were valid concerns that we hadn’t thought of. What we didn’t know was most of our parking lot light poles are only energized during certain times and there were concerns about wind loading invalidating light pole warranties. After that idea got scrapped, my supervisor and I had many long conversations about solutions and we finally decided on providing wifi service using LTE backhaul with Cradlepoint routers. It wasn’t the perfect solution but it was quick, reliable, and scalable.

    I recalled seeing a solar solution from AccelTex not long ago so I decided to reach out to my ol pal Smitty. Smitty gathered a bunch of requirements from me so that he could tailor a solution to fit our needs. In short order we had a complete solar solution that the Cradlepoint router fit perfectly into! We were very happy with the proposed solution as it was going to quickly meet a need that we had, in a fairly fluid situation.

    Smitty and the fine folks at AccelTex were able to get 20 complete solar kits assembled and shipped to us in fairly short order. I was able to have one complete kit shipped to my house (I’m still currently working from home), while the rest were shipped to our office. I received my kit via freight one afternoon and was pleasantly surprised to find the pallet a much more manageable size than I was expecting. I wasn’t sure how many pieces and parts I was going to have to assemble, how much wiring I was going to have to do, and how bulky everything was going to be. This is what I got:

    One complete, palletized, kit

    Everything was very well packaged and arrived safely. I began the unpacking process so that I could organize the parts for assembly. Although it is a fairly large piece of equipment when assembled, there were surprisingly few parts.

    The enclosure, which is the main piece of equipment in the kit, is mostly complete upon arrival. The solar controller, wiring, circuit breakers, LTE antenna, bus bar, and remote monitor are fully assembled within/on the enclosure. To be totally honest, I was a little disappointed that I didn’t have more wiring to do because I enjoy that sort of thing.

    Also pictured here is the battery tray and solar panel wiring harness.

    Now that I had everything unpacked and organized, I began building the kit. Smitty had emailed me the kit installation documentation prior to the kit’s arrival. The installation documentation is easy to read and thorough. The install documentation is prepared with the purchaser in mind and includes information such as panel degree tilt which is specific to your location. In our case a clear view of the southern sky at a 51 degree tilt was what we needed.

    Assembly is definitely made easier by having another set of hands; something I wasn’t lucky enough to have during my assembly, but I made it work.

    Enclosure mounted to the mast, all mounted to the sled

    Soldering was not required for our kits but I decided to solder the spade connectors to my Cradlepoint router pigtail so that I knew the connection was good. This was one of the few things that I decided to do outside of the installation documentation to make for a better install. As far as the wiring is concerned, the only connections that need to be made to the system are the leads that go to the solar panel and the pigtail that supplies power to the Cradlepoint router. The bus bar has two additional locations for 12v equipment if you have the need.

    Batteries installed and wiring complete

    This was another point where I decided to go outside of the installation documentation. I ordered some DIN mounts so that I could mount the Cradlepoint router to the DIN rail, which is provided inside the enclosure.
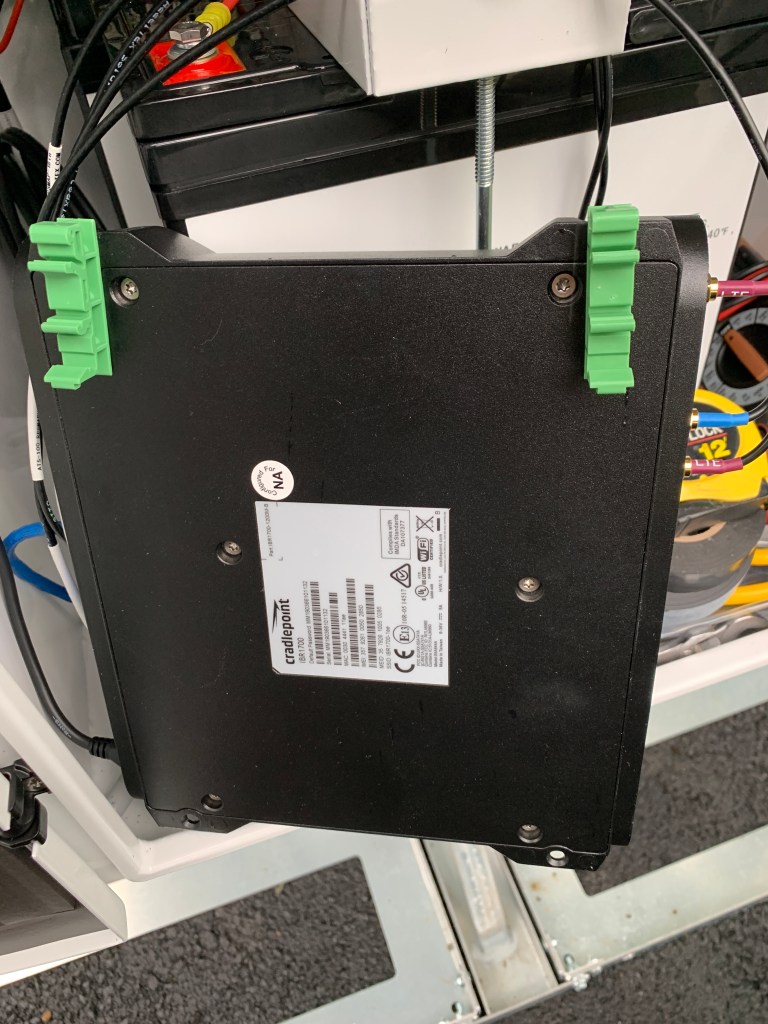
    DIN rail mounts attached to Cradlepoint

    I’m a stickler for clean cabling so I took my time to make sure all of the cabling was tidy and not loose within the enclosure. I was able to take the Cradlepoint router pig tail and create a service loop, which I attached to the DIN rail with a zip tie. I also routed the LTE/GPS leads behind the DIN rail so that both the antenna leads and router pigtail would be hidden behind the Cradlepoint router once it was installed.

    Cradlepoint pig tail attached to DIN rail. On the back panel you can see the solar panel lead passing through it’s cable gland and connected to the bus bar

    To this point, I had done the assembly in my basement. Once the wiring was complete it was time to move everything outside onto my driveway. Even though it was about 50% assembled, it was pretty heavy. If you plan on placing one of these kits in an elevated location, such as a roof, I would suggest hauling the parts up un-assembled. Our team has been doing just that since the remaining kits arrived and it has been working very well. They have been hoisting all of the materials to their permanent locations with the intent to come back at a later time for assembly. So far it is taking almost as long to lift everything to the roofs as it is to assemble the kits.

    Once I had everything moved outside, there were only a few remaining things to assemble; mainly the solar panel and external wifi antenna. At this point, the most time consuming part of the installation was started. The weatherproofing. Since the mast extends a good distance vertically, cable extension leads were provided in our kits so that the antenna would reach inside the enclosure. I picked up some 3M Temflex and “good” “regular” 3M 700 electrical tape to handle the weather proofing. Once I got the leads unwound and connectors tightened, it took me another 20-30 minutes to properly weatherproof all of the cable leads. Often overlooked, this, in my opinion, is a very important step. This is probably the amateur radio operator in me coming out. After some discussion with my teammates, we decided that weatherproofing the cable assemblies prior to install day would be a timesaver.
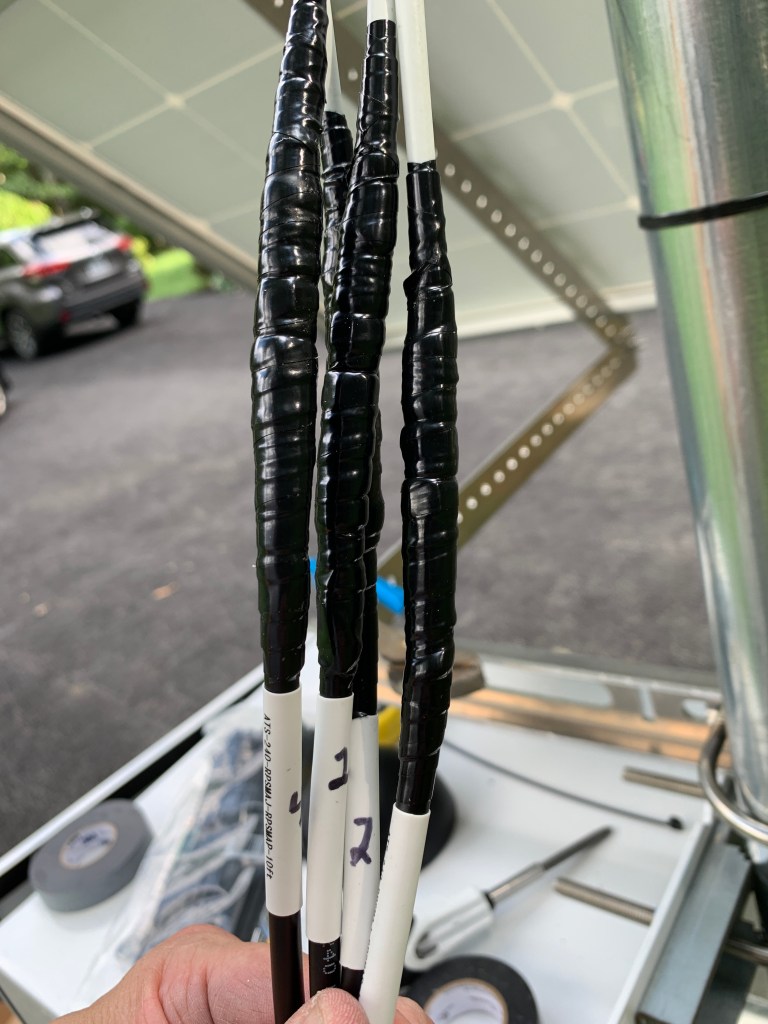
    3M Temflex followed by 3M 700 electrical tape over the RP-SMA connectors of the antenna leads for weatherproofing

    Once the leads were assembled and weatherproofed, I mounted the AccelTex ATS-OP-245-47-4RPSP-36, which we affectionately refer to as the “Everyman’s Antenna” because of it’s versatility. In this case, we chose the four lead RP-SMA Everyman’s because the Cradlepoint IBR1700 has four RP-SMA connectors for the wifi antenna and it met our requirements.
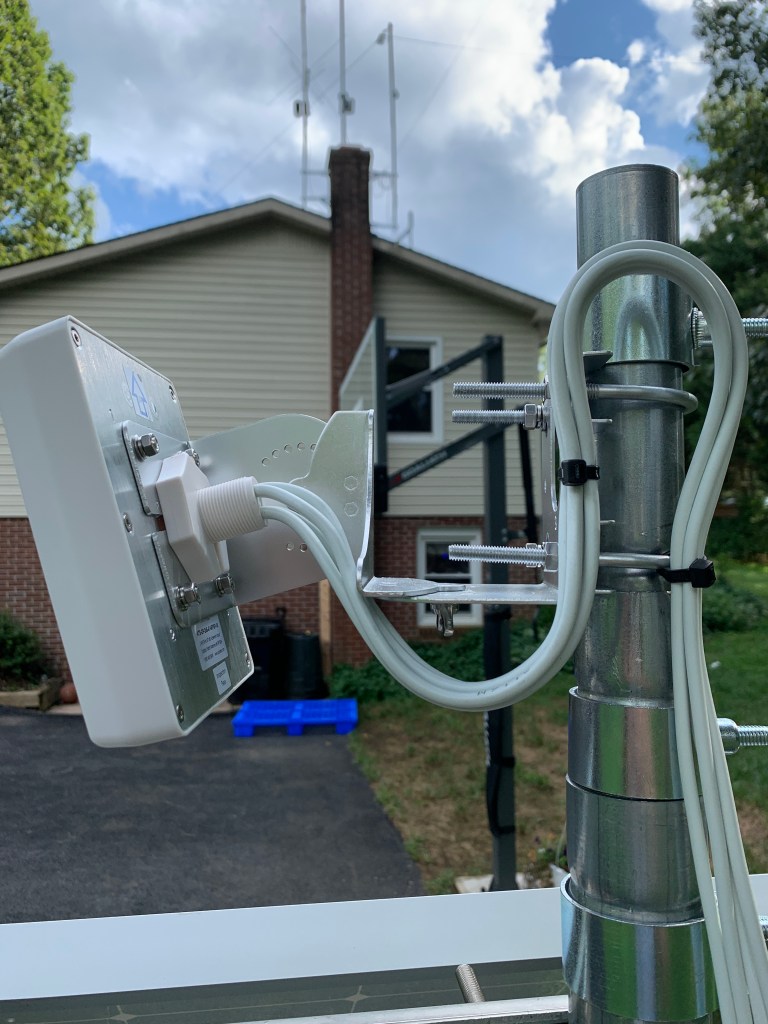
    AccelTex ATS-OP-245-47-4RPSP-36 “Everyman’s Antenna”

    After the antenna was mounted I strapped the leads to the mast with a removable strap, in this case velcro because I didn’t have anything else at the time and I wanted to be able to easily move the mast up or down without having to cut zip ties. I would highly recommend strapping the cables so that they aren’t catching wind and/or rubbing against any metal pieces, which could cause the insulated jacket to fail.

    One thing I would potentially recommend to AccelTex would be to include larger cable glands for entry of the antenna leads into the enclosure. The enclosure comes with two cable glands and third blank. One of the cable glands is dedicated for the solar panel wire harness. The four leads that I had for my antenna would not fit through a single cable gland. I have spare cable glands from other projects so I removed the gland that was shipped with the kit and replaced it with a larger M25 gland that accommodated all four leads perfectly. Once I discovered the better fit, I ordered a couple more bags so they could be used in the remaining kits.
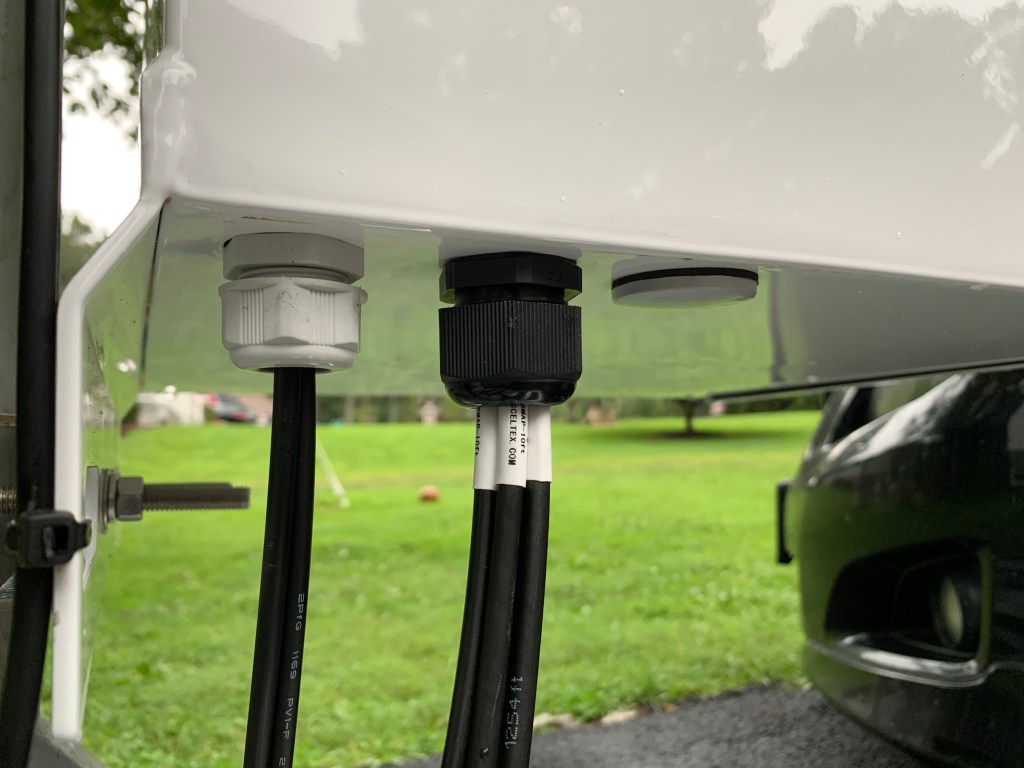
    Stock cable gland on left. Larger, M25 cable gland on right.

    Once I had the antenna leads into the enclosure, I attached smaller, more flexible leads to the existing leads before finally attaching them to the Cradlepoint. I am glad AccelTex includes the smaller diameter leads as it makes for easier cable routing, and an overall nicer install. I tightened these leads to the existing leads but did not weatherproof the connectors because they would remain inside the enclosure. I was able to make sure this would happen by fastening a zip tie around the leads just inside the enclosure. By doing this, the leads could not slip back through the cable gland.
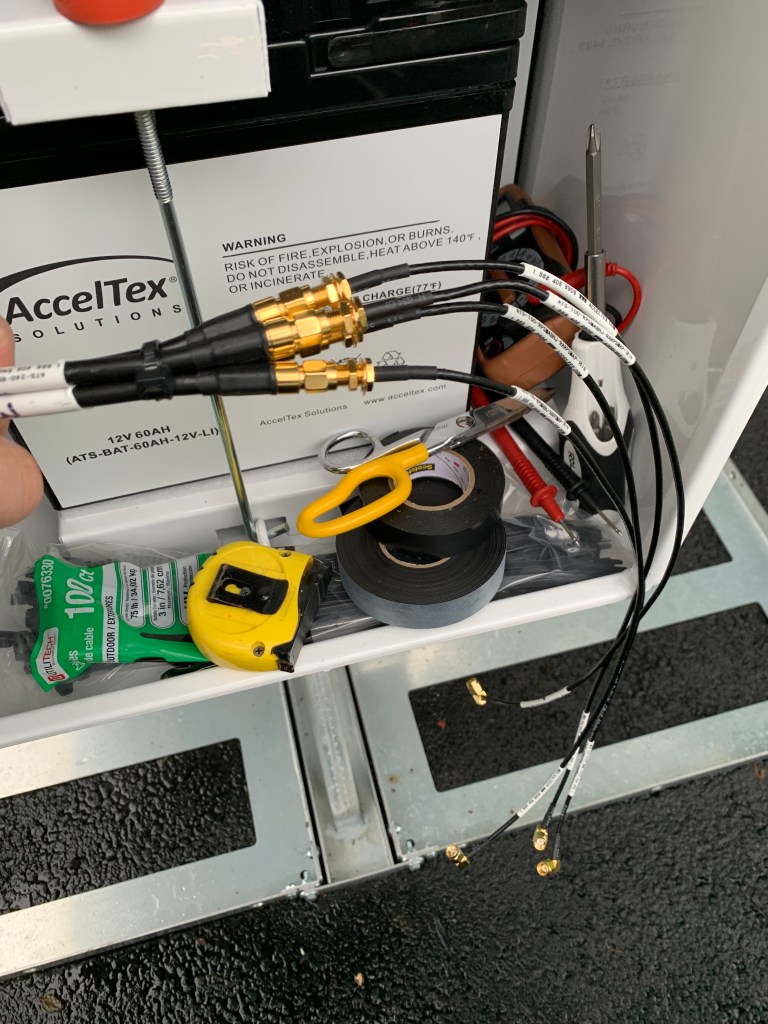
    External leads were run through the cable gland and then attached to smaller diameter internal leads. I attached a zip tie so they would not slip back through the cable gland.

    Once I had my cabling in order, I attached the LTE/GPS antenna and wifi antenna leads to the Cradlepoint router and attached it to the DIN rail.
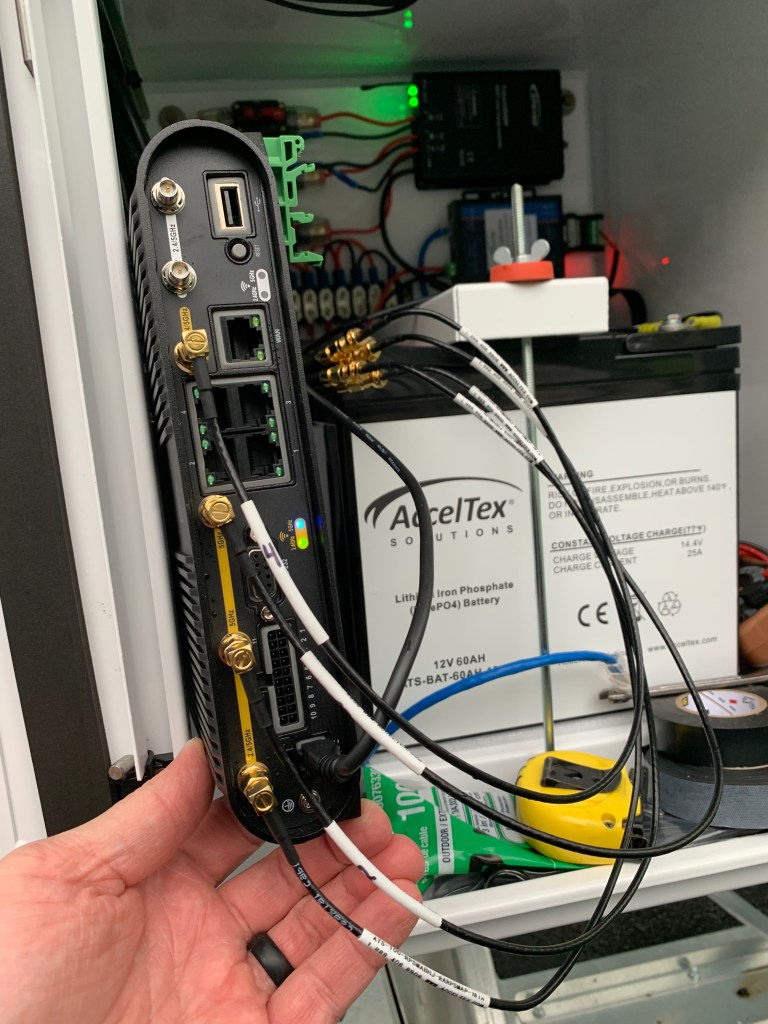
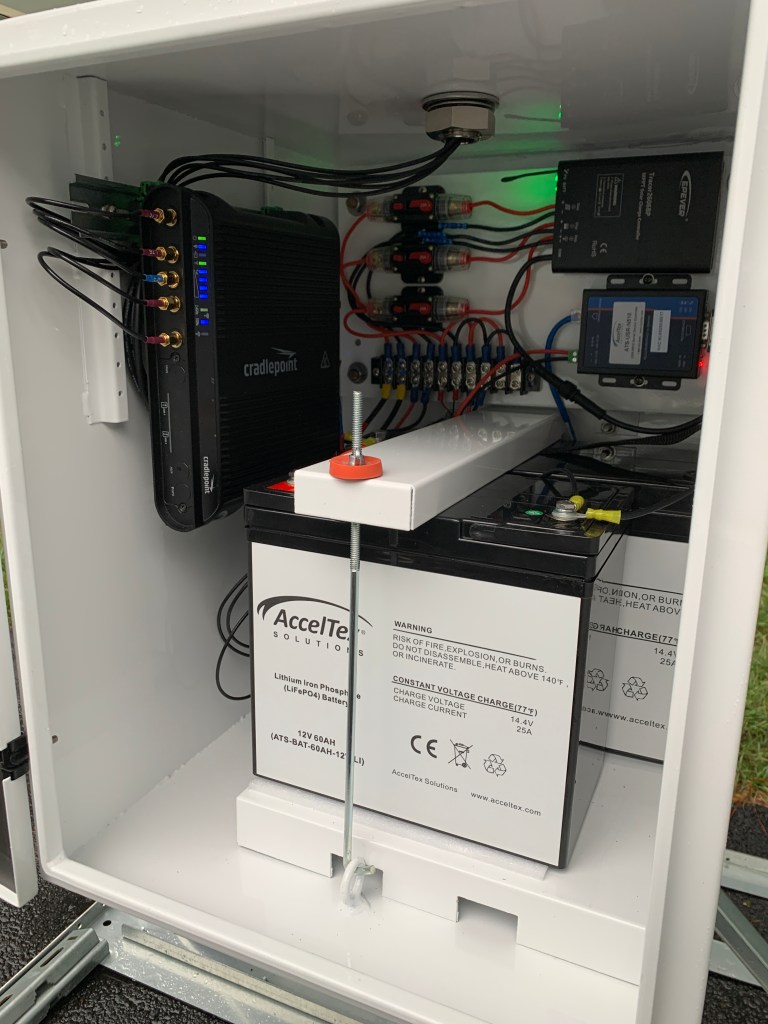
    Wifi antenna leads connected to the back of the Cradlepoint router
    LTE and GPS antenna leads connected to the Cradlepoint router which is mounted to the DIN rail

    After the router antenna leads were connected, I was mostly done. I had mounted the solar panel earlier, which was relatively straight forward. I tidied up the cables that were on the outside of the enclosure and weatherproofed the solar panel quick connectors that were on the leads. I found out later this was not necessary because the connectors are designed to be weatherproof already.

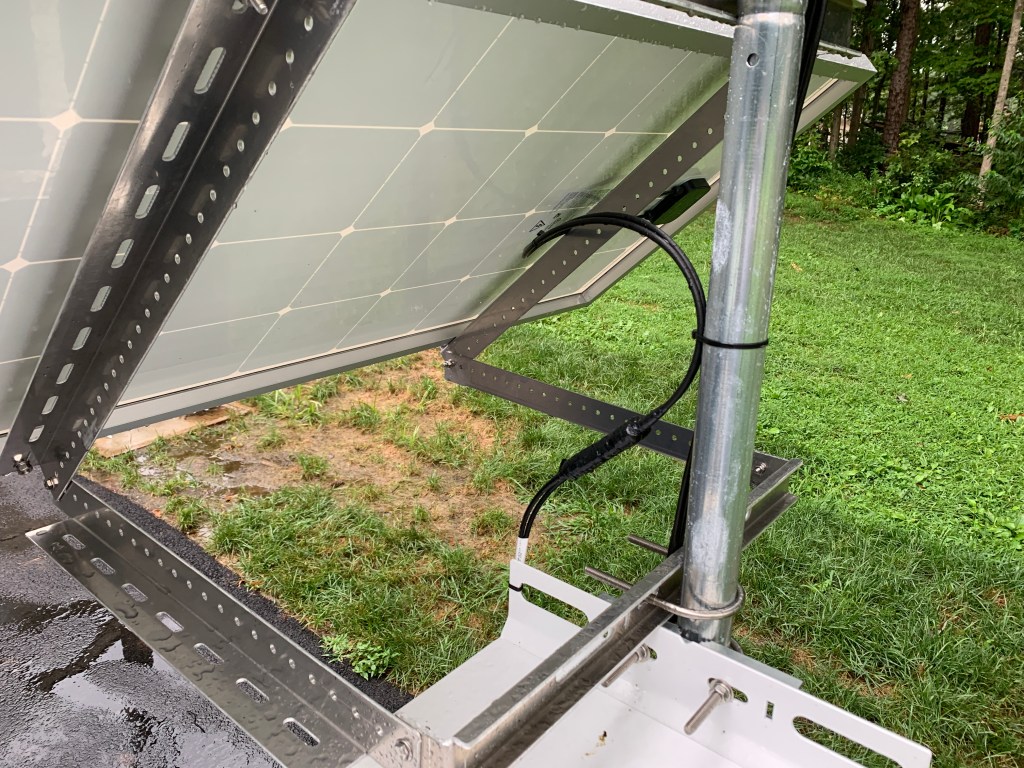
    Weatherproofed solar panel quick connect power leads
    Cleaned up cabling
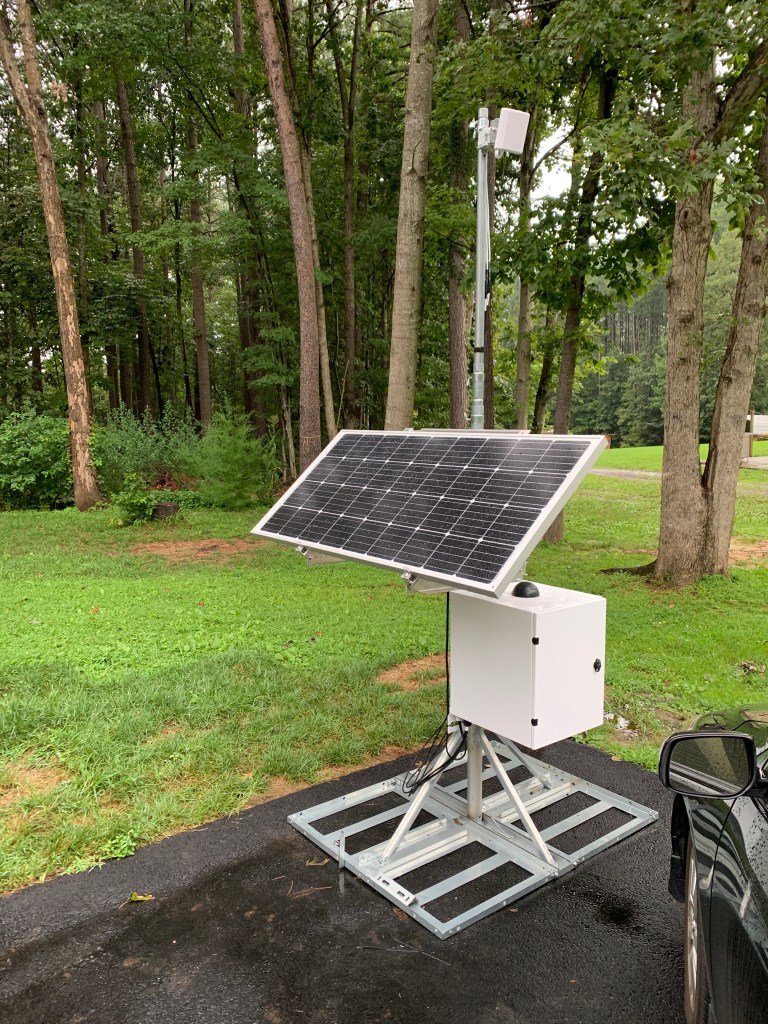
    Finished product

    The kit we chose has 160 Ah battery capacity and a 180 W solar panel. We also chose to add on a remote solar monitor so that we could monitor charging and battery conditions at each site. The batteries have been online for almost two weeks, through cloudy days and night time, and have remained online since they were wired up. The battery capacity can be sized to your needs.
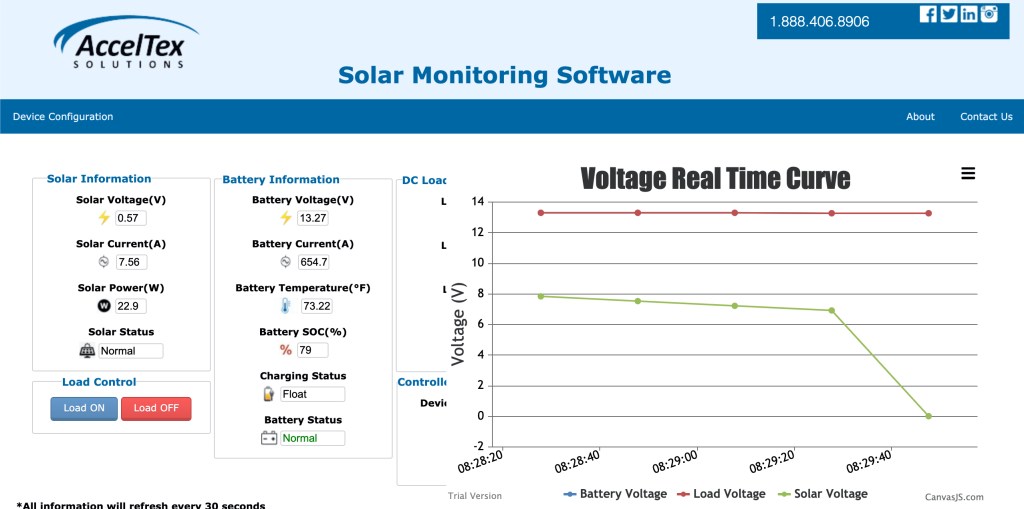
    Remote solar monitor

    Overall, this kit exceeded my expectations. The directions were great, the assembly was straightforward, the parts are high quality, and it looks awesome. Although assembly does require that you have some basic knowledge of wiring and light electrical work, it can be completed by most everyone. Everything went together very well and the first few production units are currently online at their school sites and working well.

    In a time with many unknowns and changes that can come at any moment, this kit helped us adapt and get essential network resources outside of our school buildings, reliably, and in a short amount of time. These kits are very versatile and can be placed most anywhere which makes them that much more important right now while school districts are trying to figure out ways to extend their edge outside of their buildings.

    As we already know, it is pretty crazy out there right now. I am very blessed and I feel it is somewhat of a responsibility to share knowledge like this right now. If you think this solution could help your rural school district, urban school district, or any other vertical where you need to extend network capabilities during these trying times, please feel free to contact me. I will do what I can to help out and/or try to get you in touch with someone who can. We can get through this if we all work together!

    Here are a few more pictures

  • Distant Beacons – Part 3 – Calming the Seas

    Note – Lighthouse image was used with permission from Ranveig Marie Photography.  Check out her stuff here:  Instagram, Facebook, and Flickr.

    This is part three of a multi-part post describing the tuning of Single Channel Architecture/Virtual Cell and taming ChromeOS roaming behaviors.  Part one can be found here.  Part two can be found here.

    We are very densely populated with access points to accommodate at least 50-60 devices per classroom at any given time.  Because of this AP density it is necessary to make adjustments to the network on occasion.

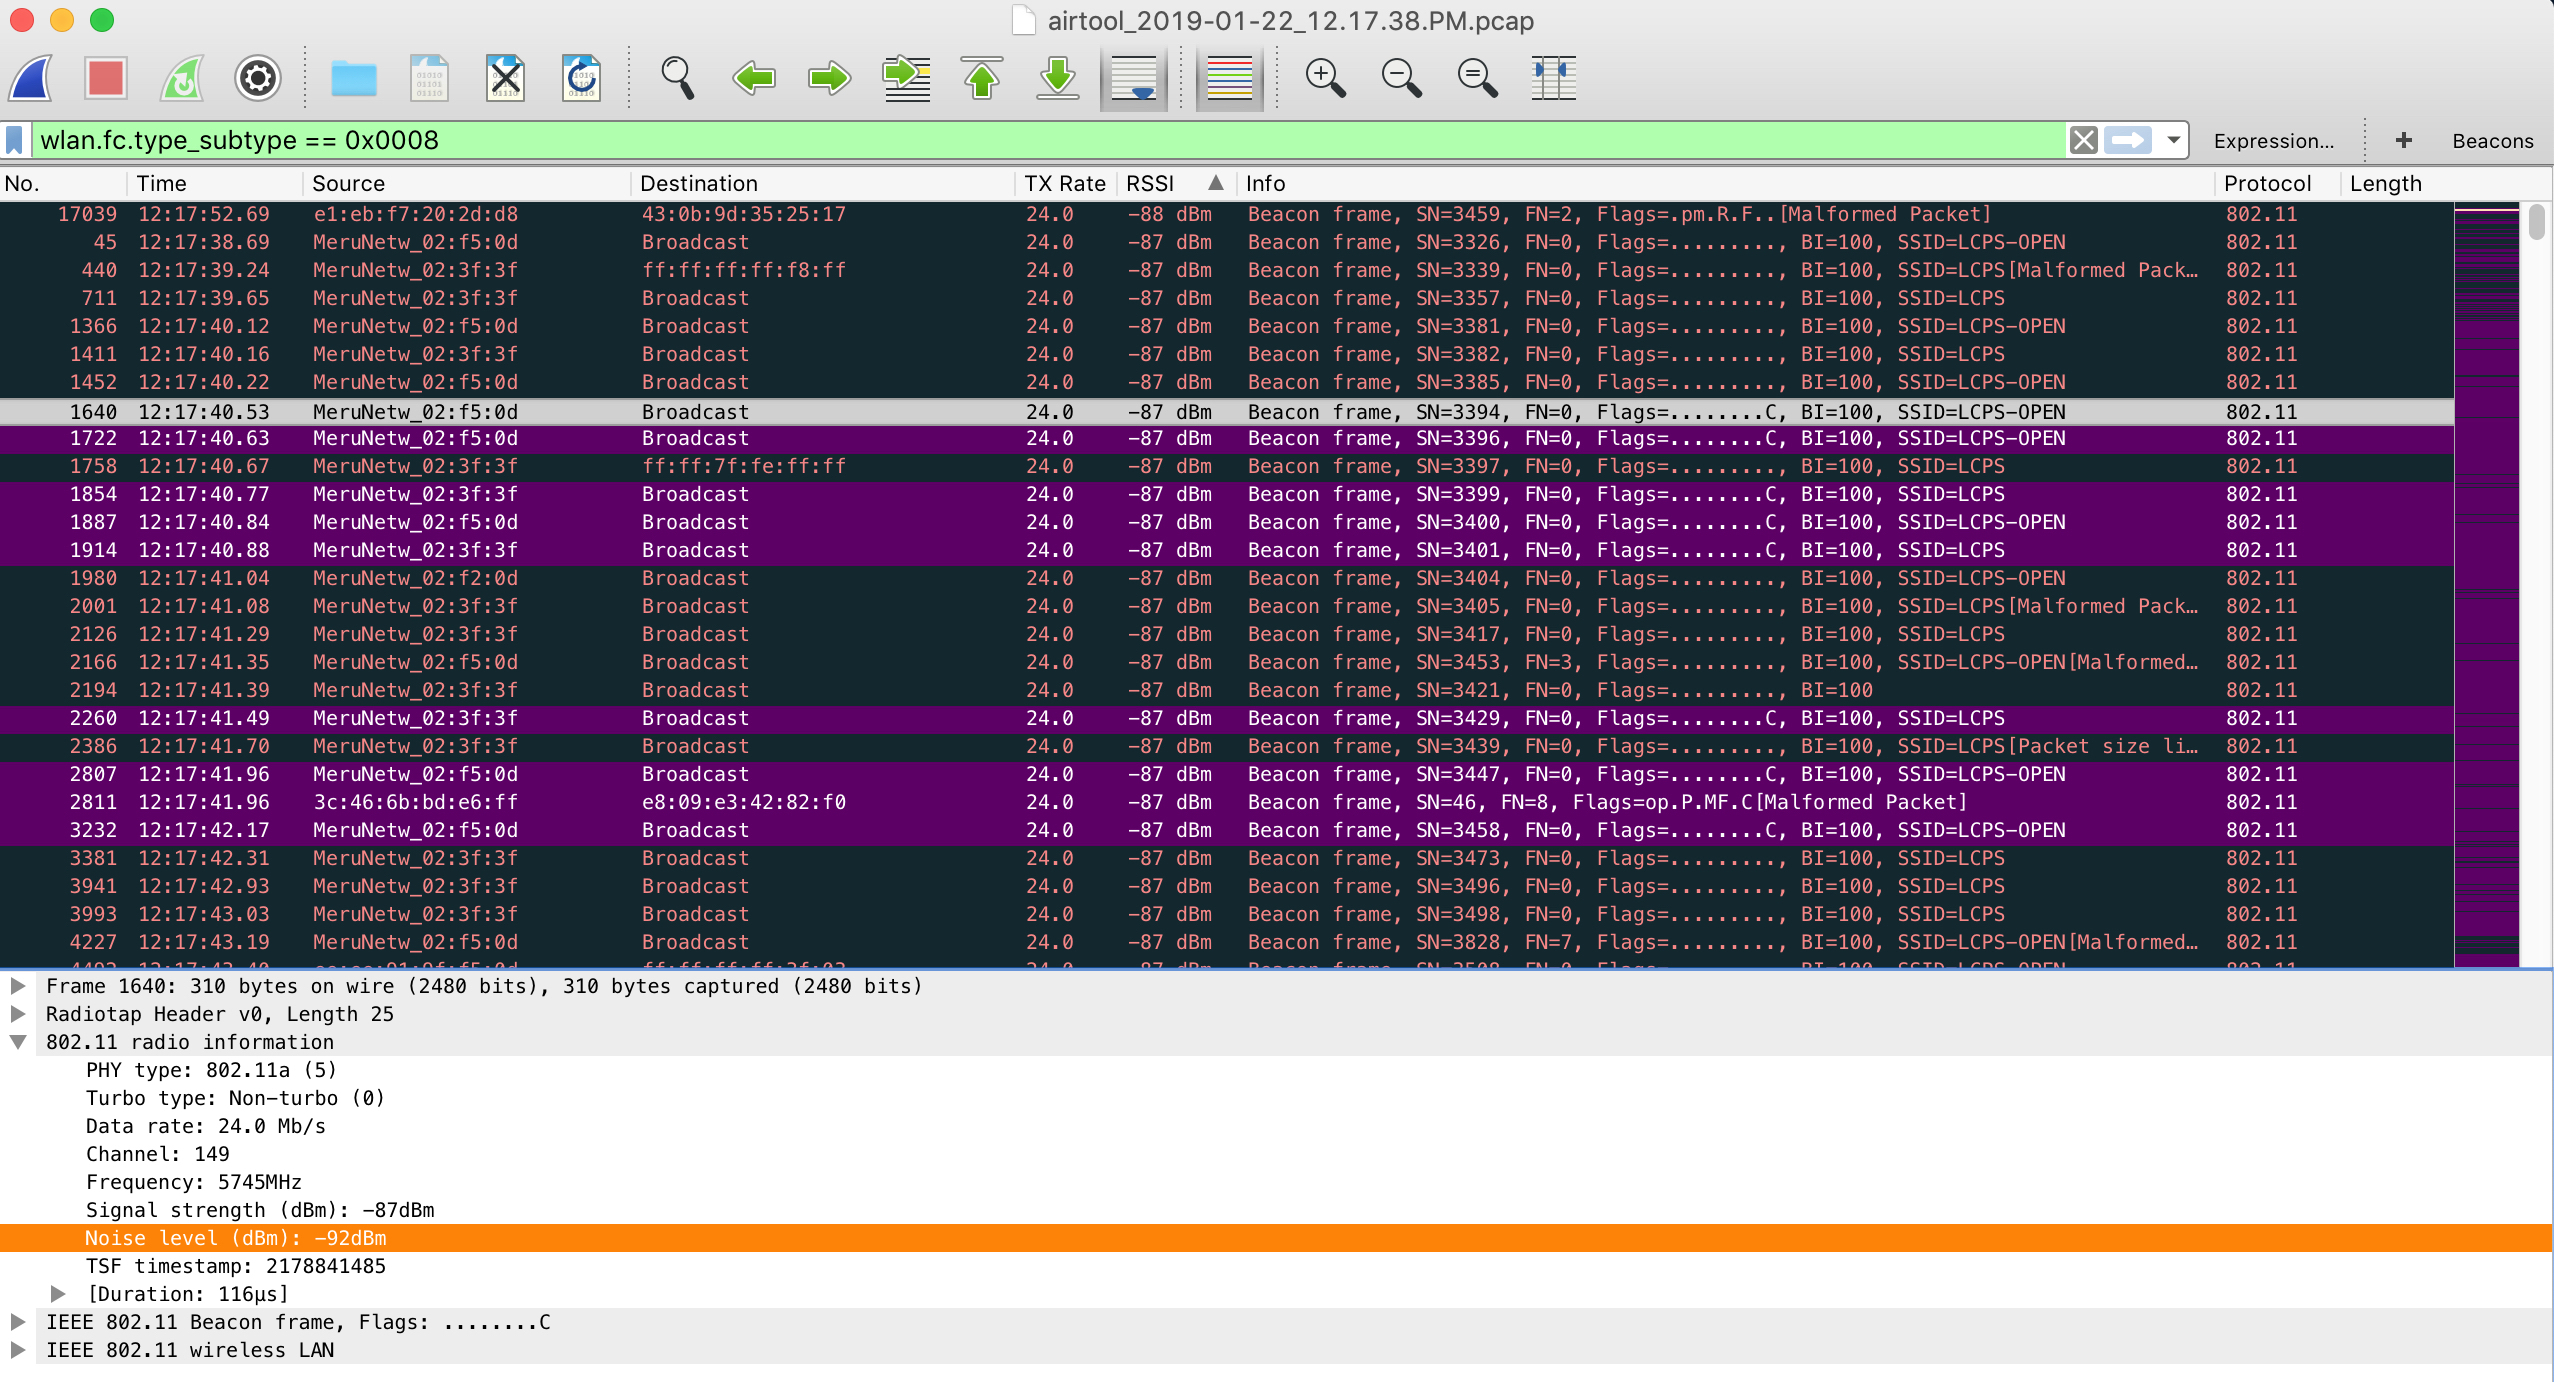
    As indicated in part two, pcaps determined that we were decoding beacon frames with valid FCS into the high -80s dBm, all with the same BSSID (Virtual Cell).  Even though there were several different devices consuming wifi in the area, Chromebooks were hyper sensitive to the fluctuating SNR and were the only device type continuously performing four way handshakes due to a triggered roam (SNR <=18).

    Since we are so densely populated with access points (to meet requirements), the only way to tune away the issue was to increase the minimum base transmit rate even further (from 24 Mbps).

    24 Mbps Base Transmit Rate – 5 GHz Radio

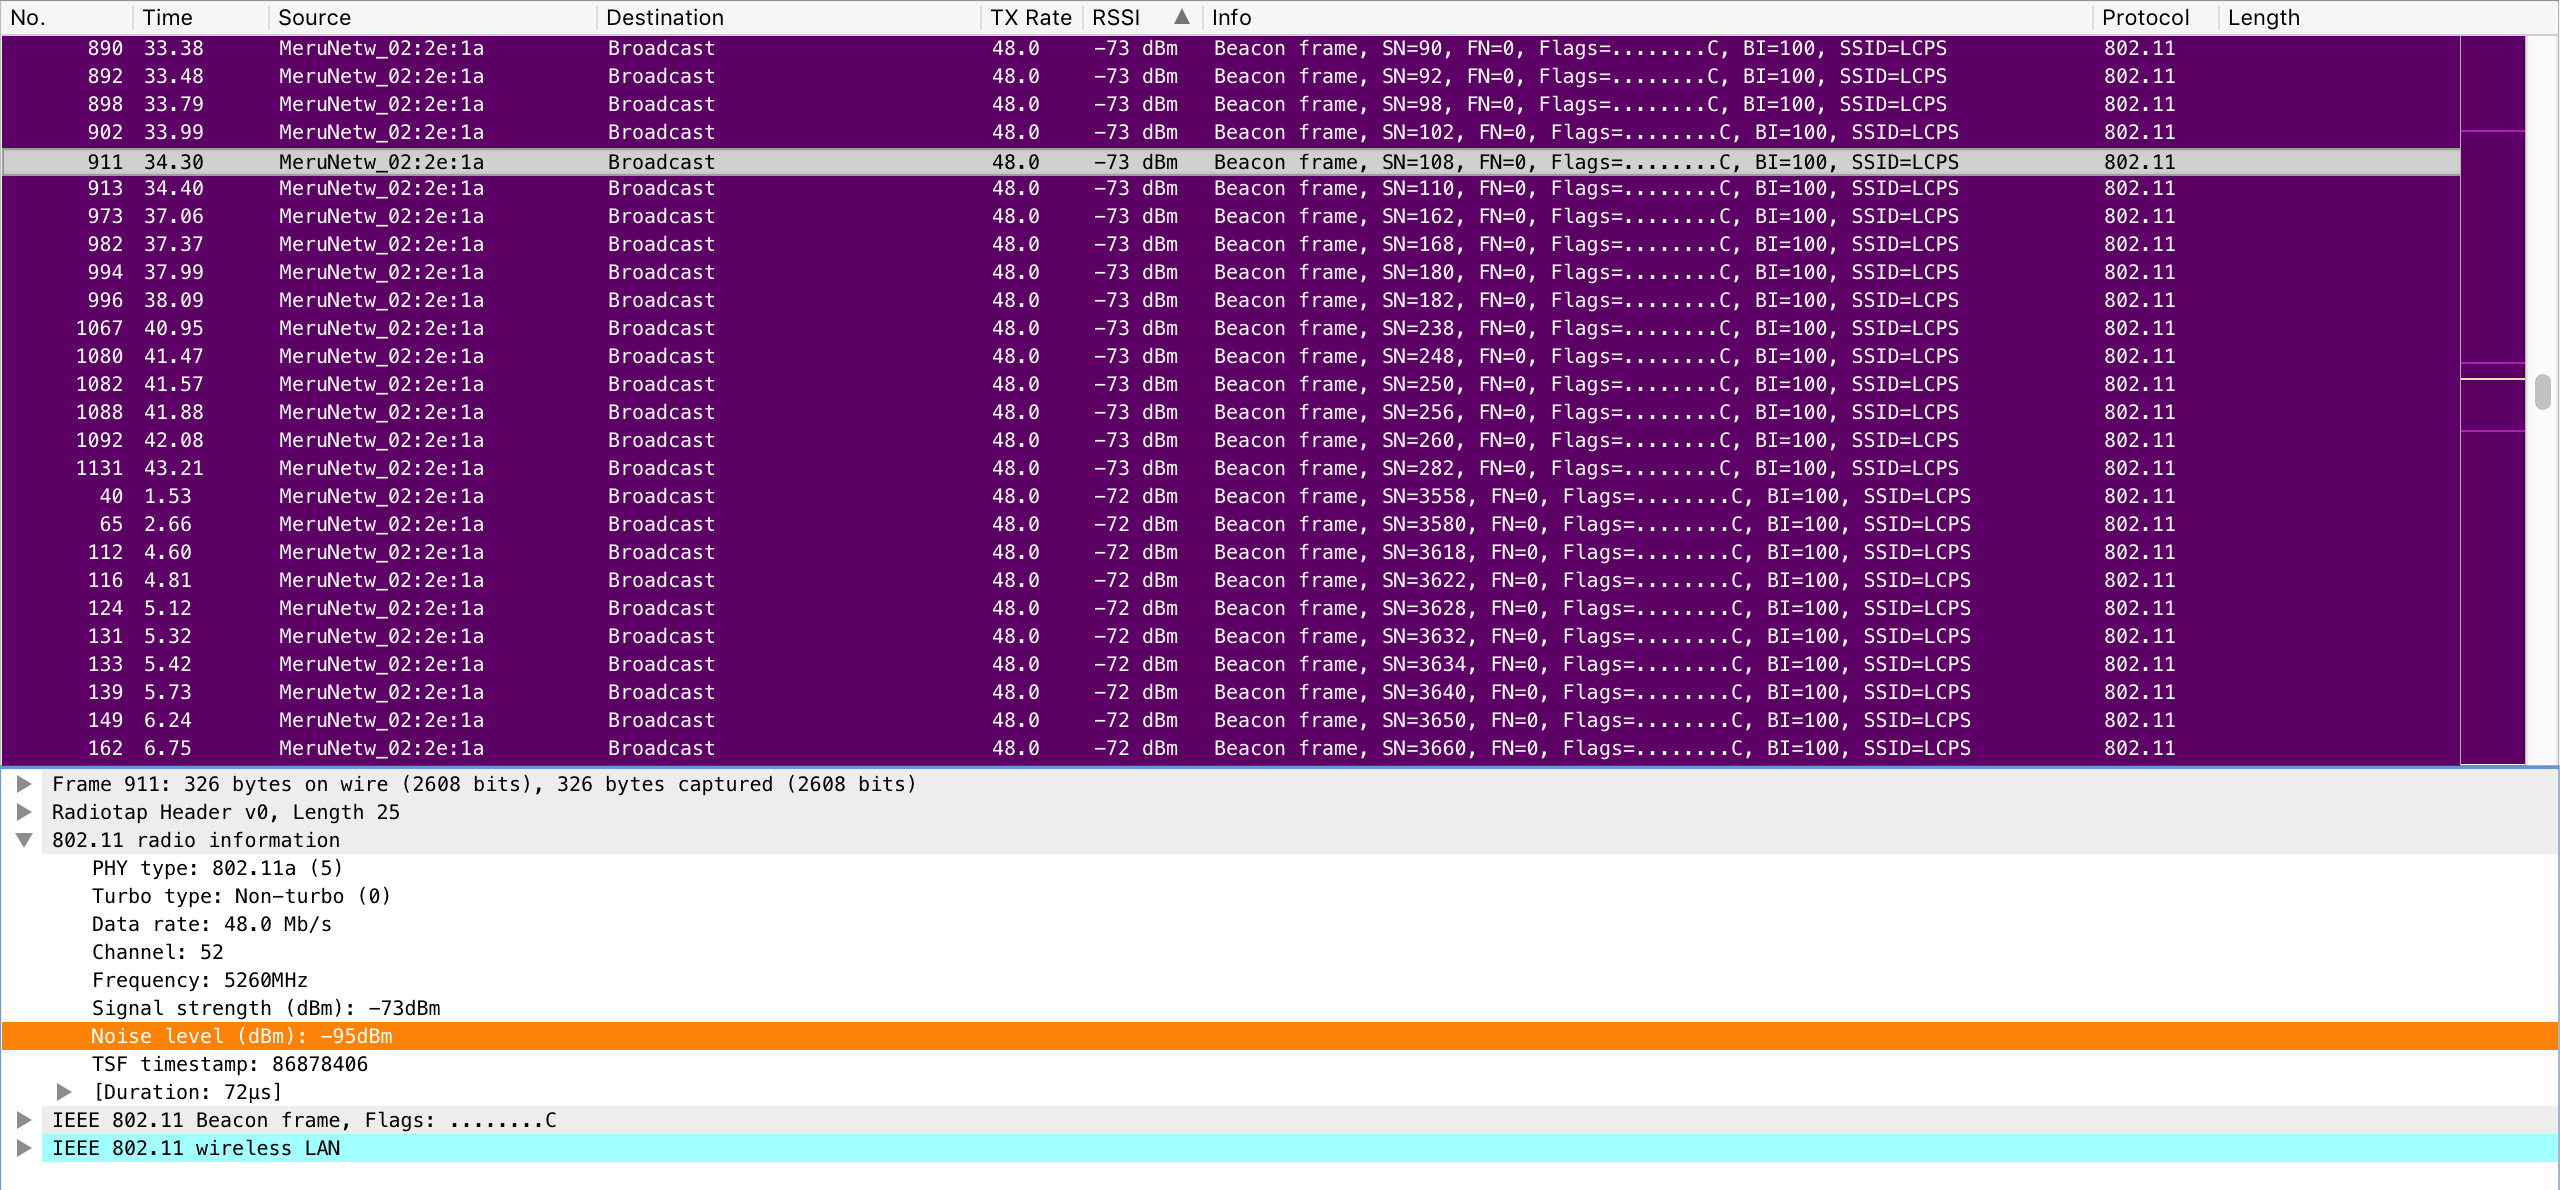
    TX power is already reduced to a level that provides proper overlap between classrooms to satisfy requirements.  Increasing the minimum base transmit rate to 36 Mbps was done first but did not yield the results that I wanted to see.  I then increased the minimum base transmit rate to 48 Mbps (also leaving the supported rates of 24 and 36 Mbps) and ran another pcap.

    48 Mbps Base Transmit Rate – 5 GHz Radio

    This time I was receiving most beacons with valid FCS in the mid -70s dBm.  Further testing with the Chromebooks showed the results I wanted to see.

    Unnecessary (triggered) roams were dramatically reduced and performance was much better.  Beacon overhead was decreased by 50% which is indicative of moving from 24 to 48 Mbps minimum base rate.


    We ended up testing this configuration change at a couple of our high schools of similar layout, design, and requirements with very good results.

  • Distant Beacons – Part 2 – A Single Port in the Storm

    Note – Lighthouse image was used with permission from Ranveig Marie Photography.  Check out her stuff here:  Instagram, Facebook, and Flickr.

    This is part two of a multi-part post describing the tuning of Single Channel Architecture/Virtual Cell and taming ChromeOS roaming behaviors.  Part one can be found here.

    It is no secret at this point that I maintain a very large Single Channel Architecture/Virtual Cell wireless network.  From time to time there are certain nuances that force our hand into making adjustments to the wireless network, which  really is no different than any other network, SCA or MCA.  Since we do primarily use a single channel throughout our instructional spaces, a single, identical, BSSID is seen by all clients within a Virtual Cell.  Recently I was troubleshooting network performance issues on Chromebooks and found that they were constantly performing four way handshakes, several times per minute.  Other devices in the area, including my Mac, did not experience the same problem.  I decided to pull some pcaps to see what I could find.  I ran Wireshark for a period of time then filtered out beacons (wlan.fc.type_subtype == 0x0008) and sorted them by lowest to highest RSSI.  What I found next started to pull things together from several other recent troubleshooting sessions.  I found that my beacons, all from the same BSSID, had valid  FCS and were being received with RSSI into the high -80s (dBm).  This only left room for an SNR in the single digits.

    Because the SNR was so low on these distant beacons, unnecessary roams were being triggered on the Chromebooks even though there was ample signal available from much closer access points.  From one second to another, a device could hear several beacons with the same BSSID, some with very poor SNR and others with very favorable SNR.  For the last couple of years we have found a sweet spot with TX power and minimum supported rates which has worked nicely with the vast majority of the 80,000 devices we see at peak on a daily basis.  Until the recent influx of Chromebooks (tens of thousands) in the past school year there has been no reason to make any adjustments.

    RX-SOP?

    Stay tuned for an upcoming post on changes that were made to the infrastructure to make these sensitive devices behave better.

  • Distant Beacons – Part 1 – One Size Sail For Every Ship?

    Note – Lighthouse image was used with permission from Ranveig Marie Photography.  Check out her stuff here:  Instagram, Facebook, and Flickr.

    This post will serve as part one of a multipart post concerning recent happenings involving client settings, client behavior, what was done to tune a network, and the results thereafter.

    Chromebooks have been around for several years now and love them or hate them, they are here to stay.  Chromebooks began as a low cost consumer device but have since crept their way into the enterprise, as well as established a strong foothold in the K12 vertical.  What originally seemed like a cheap compute option, is now available in many different hardware options, many times offering “better than decent” performance for an affordable price.  Don’t be fooled though, there are plenty of Chromebook devices out there that sport less than desirable performance but rep a very attractive price tag.  This initial post explains my desire to get a better understanding of Chromebooks and their behavior on my beloved wireless network.

    We currently have tens of thousands of Chromebooks in our Google Domain that are owned and managed by our school district.  We recently reached over 80,000 concurrent wireless devices on our network and ChromeOS serves as a sizable percent of that number,  steadily creeping towards surpassing iOS.  Most of the time everything works great but when there are issues reported, you can bet there is a very good chance the device in question is a Chromebook.  Known issues in the past have been cleared up by Google in relatively short order.  Other times, issues linger on and off, coming and going like the ebb and flow of an ocean tide.  In the recent past our district standardized on a specific manufacturer and model of Chromebook that would be purchased and supported by our department staff.  Many people were brought together to make sure the device met and exceeded our expectation for an exceptional user experience.  Keep in mind there are several thousand other Chromebook devices still on our network which are either legacy holdover or BYOD devices.  Ironically, despite the vast differences, many of the Chromebooks exhibit similar behaviors.  This post will go on to explain my thoughts as to why this may be.

    To get a better understanding of Chromebook behavior on wireless networks, I decided to collect data on my own.  This was done to see if I could correlate behaviors with known issues.  I decided to create a simple form on my blog that asked for a few pieces of information easily obtained from a Chromebook with a few commands.  The following information is what I was interested in:

    • Chromebook Full Model Name
    • ChromeOS Version
    • WLAN Adapter Model
    • Roam Threshold
    • Country

    Overall, I was fairly underwhelmed with the response but I did get a handful of responses (thanks to those who contributed).  Out of the responses I did receive there was one very interesting thing that stood out.  The roaming threshold was EXACTLY the same no matter the manufacturer, ChromeOS version (recent or several years old), or WLAN hardware!

    Why would 18 (roaming threshold (SNR)) be the threshold that was selected for ALL variations of Chromebooks?  What this means is that if the Chromebook’s Signal to Noise Ratio (the difference between RSSI and noise floor) drops below 18, a roam event could occur because the device deems the signal to be less than optimal.  Those of us who have been in the game for awhile know that the inconsistencies in end-point wireless hardware is the consistency.  Wireless network hardware is not calibrated by the manufacturer.  Wireless network hardware behavior will vary depending on manufacturer, device capabilities, DRIVER VERSION, etc.  In fact, two wireless network adapters made by the same manufacturer using the exact same driver, placed in the exact same model device, will behave differently!  Why would the very intelligent people at Google think that the same, non-adjustable, roaming threshold was best with so many different variables in play?  There may be a good explanation, but so far I have been unable to find it.  Other types of devices (ie. Windows) offer the ability to tune roaming behaviors within advanced driver settings.  To date, ChromeOS does not allow adjustment to these types of settings.

    As mentioned earlier, Chromebooks aren’t going anywhere.  They are good devices and fit the K12 environment well due to many factors.  As Chromebooks push further out of the consumer realm and into being an enterprise player, Google may need to adjust their one size fits all wireless settings model.  The massive difference between home use and enterprise use should drive this change unless there is a good reason not to (I’d love to know, Google!).

    Future posts will explain more discoveries and how I was able to tame these K12 beasts, with the understanding that bending a network for a single device type is often dangerous.  I like to live dangerously…

  • #NoDoors

    The other day I was working in Ekahau Site Survey and ran into an issue that I thought could use some improvement.  I took to Twitter to voice my #ESSRequest.  Rather than being met with affirmation, I had apparently committed a cardinal ESS sin by setting the scale of my project using the opening to a commercial doorway.  I am formally trained in the ways of the ‘hau and I could have swore it was suggested to me that measuring a commercial doorway was a suitable way to set the scale within a project (as long as you actually knew the real measurement of course).  After reading the reminders of my idiocy, I came to the conclusion that what my peers were saying did actually make sense.  It has been suggested that measuring a known “larger” distance will in fact yield a more precise scaled project.  After explanation, it makes perfect sense to me.  Trying to be precise within a small area creates room for error.  A small mis-measurement of pixels could render your project flawed and the error could grow exponentially as your survey grows.  Setting the scale of your project should be done using a known length of something much larger, such as a long corridor, wall, or something of the like.

    It sucks being wrong, but I will admit my shortcomings.  I am a certified “Expert” but I do come up short sometimes.  It is my belief that an expert should always have an open mind and should always be willing to learn new things, even if it is something that he or she “should” already know.  In this particular situation, I was re-evaluating what I “should” have already known on my commute to work.  Even though I do agree with the #NoDoors policy, it did challenge me to think even deeper about the approach we are to take when scaling our surveys.  If measuring a small, “inconsistent” feature such as a doorway within a map could skew your survey data into the toilet, what would the impact of being 5 inches off your line doing a continuous survey be?  The center of a zoomed out hallway looks a lot different than a zoomed in hallway within ESS.  What if you inadvertently walked diagonally off your line 10 inches in a large open space?  Simply zooming in and out between stop and go measurements could make a massive impact to your survey.  I know I have done surveys where I zoomed in on the start of a continuous survey and found that I was actually a couple of feet off of my starting mark.  Being zoomed out might have you think you are up against the end of a hallway, while zoomed in will show a much larger gap between the wall and your starting point.  How do we make our surveys as accurate as possible?  Garbage in is garbage out, right?  The only way I can think of to get absolute precision is by using a GPS.  I have no real world experience using a GPS with ESS but I would think GPS signal within a building is somewhat of a challenge.  Perhaps I need an ECSE refresher?

    I think the answer to these questions were perfectly summed up by my colleague in a DM while I was conversing with him about this exact issue:

    There is no way you can get everything precise within your survey.  There are going to be inadequacies and errors.  Some of the errors will be inconsequential and some will have a serious impact on your finished product.  The best thing to do is use the knowledge that you have to minimize mistakes and make good decisions based on training and experience.  Is running a second survey for comparison a good idea?  Validation is key, right?  Sometimes ultra-precision isn’t practical.  Time is money…

    At the end of the day we all want to do a great job with our work.  We will all make mistakes, even us “Experts.”  We will all learn from those mistakes (hopefully).  We also need to remind ourselves there is more than one way to get to a suitable solution and delivery is key when putting someone on notice about their ill advised practices.

    I still have new questions about the precision aspects to surveys.  I am in no way disqualifying the usefulness of ESS.  I couldn’t do my job and be successful without it.  The good people at Ekahau have created a truly EXCEPTIONAL product and are building on its greatness.  Ekahau Site Survey’s greatness is second only to the incredible people who make and teach it.  I look forward to each opportunity I get to use the software and I consider myself one of the lucky ones that was able to sit the Ekahau Certified Survey Engineer class.  I’m sure the vast majority of ESS users are self taught or are unable to attend an ECSE class for any number of reasons.  If you are afforded the opportunity, I STRONGLY recommend taking an ECSE class.

    Keep up the great work Ekahau!

  • AirCheck G2 v3.0; Building on a Wifi Testing Stalwart

    There are many good things continuing to happen with everyone’s favorite wifi troubleshooting tool from Netscout.  The AirCheck G2 will have new firmware released this coming week on Tuesday, October 23.  These new features expand on the tool’s already great feature set and should have any engineer feeling even more confident while troubleshooting. Version 3 is bringing many new features to your AirCheck.  Upgrading the AirCheck G2 becomes easier to upgrade with over the air firmware upgrades.  The only requirement to take advantage of this new feature is to have a current support contract.  This is a great time saving new feature. Another feature new to the Aircheck will be the ability to share your profiles with other AirChecks within your organization.  A profile can now be easily uploaded to Link-Live and shared among other AirChecks under your control. Adding to Link-Live’s new versatility is the ability to upload full AutoTest and Connectivity results, session files, screenshots, and packet captures.  I pulled a packet capture for my iPhone after recently upgrading and saw the new option to upload to Link-Live.  I simply selected the Link-Live feature, logged into Link-Live and found my pcap ready for analyzing.  This builds on the ability to quickly transfer a pcap to a USB drive which can be connected directly to the AirCheck. Enhanced AP naming support has been added to get a better idea of which AP you are currently working with.  APs from Cisco, Aruba, Huawei, Aerohive, and Extreme Networks are currently supported.  Hopefully Fortinet will be added soon.  I still rely heavily on my AirCheck G1 for identifying Meru/Fortinet APs due to it’s ability to read the AP ID information element.  I continue to patiently wait… Improved packet captures allow the user to start and stop the packet capture on a specific device or channel.  As mentioned previously, you can also now upload your packet capture to Link-Live for easy sharing of data with others in your organization. Another major enhancement is the ability to transfer certificates directly to the AirCheck using a USB device.  I know this was a request in the past and the good people at Netscout listen to their customers! By now many of you may know that Netscout sold their “tools” to StoneCalibre, a private equity firm, on September 14.  Netscout presented their future plans for the AirCheck and LinkRunner at Mobility Field Day 3 on the same day that the deal occurred but the formal announcement wasn’t made until the following Monday, September 17.  Netscout was clearly aware of what was going to happen but still had a detailed roadmap for their products going forward.  Their confidence seemed to be at an all time high and didn’t appear there was any reason for concern.  I am still very confident in the product line going forward and am excited to see where this deal takes them. If you have a current support contract with Netscout, get ready to download the new firmware this coming Tuesday, October 23.  There are many more features included that I didn’t mention in this post that will enhance the usability of an already great product.
  • From the Edge to the Air, Fortinet’s Full Stack End to End Solution

    As much as I hate to admit it, Fortinet is more than just “those guys who bought Meru.”  In fact they are way more than just a wireless company.  As we already know, Fortinet is best known in the industry as a security company with a rock solid reputation.  The truth is, Fortinet is a true end to end solution, beginning with their FortiGate, moving through their switching, and into their wifi.

    Fortinet’s wireless solution is  broken into three distinct management platforms; FortiGate, FortiCloud, and controller (WLC).  Check out one of my blog posts from earlier in the year where I broke down the differences here.

    Until recently I had been mostly unfamiliar with anything but the controller solution which is built on the legacy Meru product.  As most of you already know I have an affinity for the FortiRu product line which goes beyond the controversial Single Channel Architecture.  The hardware is rock solid and it seems as though their code is a lot less buggy than what I hear from customers of other vendors.  The cloud managed solution also seems to be a very viable solution as it chugs along in the lab at my house.  This is of course a far cry from a true enterprise deployment but from what I know it seems to be reliable. Compared to other cloud managed competitors who have been around awhile, the one downside to Fortinet’s cloud managed solution is it could stand to be somewhat more intuitive during configuration.  In Fortinet’s defense, it is hard to stay unique, not re-invent the wheel, and yet remain intuitive in an already saturated cloud managed playing field.  The third management option is via a FortiGate.  In all honestly, I have not tried this method before so I shouldn’t comment until I am more familiar.  I have been graciously provided a FortiGate 81E as well as FortiSwitch 108E to check out but haven’t had the time to dive in yet.

    Those who aren’t familiar with Fortinet should pay very close attention to their licensing platform.  Aside from a select few products, THERE ISN’T ONE!  You don’t need to sift through confusing price lists to find licensing for APs, firewall features, etc because there are no additional licenses required to operate the equipment you bought!  If there is one thing that sticks in the craw of IT professionals these days, it is licensing that needs to be considered for what seems like every single feature/widget that comes with “Box X.”  Not only do you have to think about the confusing and cumbersome licensing when you purchase “Box X,” you have to deal with it each time those licenses come up for renewal.  Not with Fortinet!  Reliable hardware, mostly stable code, and no licensing should move Fortinet onto your short list for consideration the next time you are evaluating equipment for your next purchase, and give you comfort in it’s potential to be a that true end to end solution.

    Check out the following videos from our visit with Fortinet at MFD3 below.

    Fortinet Company Introduction: From Security to Wireless with Chris Hinsz

    Fortinet Portfolio Overview: Access Points and More with Chris Hinsz

    Fortinet FortiGate as a Wireless Controller: Bringing the Security Fabric to the Edge with Koroush Saraf

    Fortinet FortiGate Demonstration with Koroush Saraf

    Fortinet Wireless Analytics: Birthed in Retail, Applicable to Everyone with Koroush Saraf

    For those who lived through the Meru presentation a few years ago at Wireless Field Day 5, many were left with questions about Single Channel Architecture.  This year Ted Fornoles gave a brief presentation on how the “special sauce” behind Single Channel Architecture actually works.  Ted is one of the last remaining “Original Gangsta” Meru guys left within Fortinet.  More time could have been spent here but overall the presentation was great.  Although no questions were asked, there were still some skeptics in the room.  I know it works, Fortinet knows that it works, but there are some out there who will always refuse to accept SCA as a viable, scalable option regardless of what is said.  I stick to my original position on Fortinet’s  publicity of Single Channel Architecture.  If you aren’t already familiar, check out a blog post from earlier in the year here.  I wish there was more talk about SCA from Fortinet’s camp as their silence gives off the appeal that they don’t have confidence in Single Channel Architecture going forward.  Even though SCA has been around for several years now, and is getting somewhat long in the tooth without further advancement, there has to be something Fortinet can do to bolster the SCA solution and make it a heavy hitter in future wireless adaptations.  Check out Ted’s video explaining Single Channel Architecture below.

    Fortinet Virtual Cell & Single Channel Demystified with Ted Fornoles

    A Very Special Thanks

    As many of you know I use FortiRu gear to provide wifi to 100,000ish students and staff every day at Loudoun County Public Schools.  Before I worked for LCPS, I installed and configured FortiRu wireless gear for a VAR.  Pretty much my entire wifi career has been based around FortiRu wireless networks and more specifically Single Channel Architecture.  Over the last several years working with FortiRu, I have had the chance to build many relationships with people who work(ed) for Meru/Fortinet.  Three fellas of note within Fortinet SWAT (TAC) I work with on a regular basis are Kaushik, Harish, and Vikas.  These guys are always available to help me and I often feel bad for interrupting their day by not going through the traditional methods of seeking help, such as submitting a ticket or calling support.  They go out of their way to make sure I get the assistance I need as quickly as possible.  I can’t say enough about these guys as they have truly made a positive impact on my wifi career.  Without them, the success I have had would not have been possible.  While at Mobility Field Day 3, I had the chance to meet Harish and Vikas in person.  It was great to shake the hands of these terrific engineers and thank them in person for all that they do to support me.  Again, thank you very much Harish, Kaushik, and Vikas.  You guys are huge assets to Fortinet.  I hope they know how great you guys are!

    Me and Harish at MFD3

    Another special word of thanks goes to Paul Lambert.  I met Paul via Marcus Barman a couple years back.  Paul has been an invaluable asset to me as I strive to provide fast, reliable wifi to 80,000 concurrent devices at peak every day.  Paul is also one of the very few “Original Gangsta” Meru guys left at Fortinet.  Paul spends most of his time on the security side of things these days but he is still one of the most knowledgeable people in the world (aside from Dr. B.) on Virtual Cell.

  • Fortinet, Meru, FortiRu Forti-WHO?

    Since last week’s open letter to FortiRu, I came to the realization that there may be some confusion related to Fortinet’s AP product line.  I decided to throw this post together so that it is easier to understand which APs are what, and which category they fall into.  Keep in mind this is a high level overview to simply point out the different AP product lines.

    Lets jump right into it…

    Fortinet offers three different management options under it’s Enterprise Secure Wifi solution; FortiGate, Cloud, or dedicated controller, and five different AP lines that fall into one or more of those management options.

    Excerpt from Fortinet Product Matrix

    Access points that can be managed via the ForiGate or the Cloud are broken down here:

    Standard 802.11ac

    Standard 802.11n

    Smart APs

    Universally Manageable APs

    The FortiAP-S313C, which was given to attendees of the recent Wireless LAN Professionals Conference, falls into the preceding category.  You can read a great blog post about the FortiAP-S313C AP written by my apple butter lovin’ buddy Lee Badman here.  Please pay close attention to what Lee says concerning the licensing for these APs.  A true game changer…

    FortiAP-S313C

    There may have been some confusion with the FortiAP-S313C stemming from the Fortinet presentation at WLPC.   The FortiAP-S313C is NOT from the Meru pedigree of access points of which I will elaborate on next.

    Access points that are managed from a dedicated controller are broken down here:

    Standard APs

    Universally Manageable APs

    AP1020

    AP832

    These APs ARE from the Meru lineage of access points which I affectionately refer to as FortiRu.  These APs support Virtual Cell/Single Channel Architecture and are still commonly referred to as Meru access points.  The APs in the Standard AP list are all carry over from the Meru purchase.  The AP1020 and AP832 are models that we use in our school district and the models that I have the most experience with.  Both the AP1020 and AP832 have been rock solid since their release to market.  It is often confused that these standard APs are only capable of operating under Virtual Cell/Single Channel Architecture.  All traditional Meru access points can operate in EITHER a multi channel OR Virtual Cell configuration.

    You may have noticed that under each section there was a group of APs referred to as Universally Manageable.  These APs can be managed using any of the three management solutions.  Just like its’ Meru predecessor, the Universal AP can be used in EITHER a multi channel OR Virtual Cell configuration depending on the chosen management solution.  I should have more to write on the “U” line of APs in the near future as we should be receiving some very soon.

    FAP-U421EV

    As previously stated, this blog post was intended to be a high level overview of the Fortinet/Meru (FortiRu) AP product line.  Clicking on the links and reading through the material will give you a deeper explanation into each of the access points.  As always, if there are any questions, comments, corrections, etc, please feel free to reach out to me.

  • Dear FortiRu; An Open Letter of Affection, Disappointment, and Encouragement

    Dear FortiRu,

    You and I have been together for almost seven years.  We have been many places together; local government buildings, soft drink distributors, beer distributors, small town banks, surgical tool manufacturing facilities, resorts, retirement communities, many private and public schools (too many to count), and Thomas Jefferson’s Monticello (Remember TJ’s attic?).  We have had ups and downs but to be honest it has been mostly a positive relationship.  I will admit, there was a time when I didn’t want to talk much about you and I, afraid of what others would think, but I eventually professed my affection for you publicly.  Many out there were launching arrows at you and it became too difficult to stand by and watch you take hit after hit.  You would get criticism, some just, but mostly un-just, from people that barely knew you or didn’t know you at all.  I tried to jump in and take bullets on your behalf.  People kept firing…

    It has been nearly three years since we reached a milestone in our relationship.  Some milestones are good, some not so good.  I’m not sure which one is a good reflection of us yet.  Some people probably wonder why I care so much about you.  My answer would be that after you have been with something for so long, it becomes part of you.  I feel like I have so much invested in you.  You have been great for me and my career!  There are many more fish in the sea and sometimes I think I might be better off somewhere else, but I always find my way back to you.  You have been there since I decided to really focus my attention on wireless technologies.  You have been there as my career blossomed and you have even give me opportunities that I may have not had otherwise.

    My questions for you at this point in our relationship are this; where do you see us going?  Do you think we have a future together?  Not necessarily where everyone else is going (MCA), but with something that our relationship has a FOUNDATION on (SCA\Virtual Cell)?  All those other choices out there seem so much alike.  Some are built in the cloud, offer similar features, and solid reputations, but you… you are different!  You have something special.  You have something that others have tried but have failed at.  That cute little thing you do (SCA\Virtual Cell) “may” be getting a little stale, but there are so many advantages and unrealized potential.  I was hoping so badly that the milestone I spoke of above would bring a revitalized fire, and I hope that it still might!  There have been GREAT improvements since that milestone but I just don’t see where you want to be yet.  I am concerned for you.  Do you want to be like everyone else or do you want to be unique and build on something great?  How would Dr. Bharghavan, Srinath Sarang, Joseph Epstein, and Sung-Wook Han feel about the direction you are taking?  I know you might not care what they think anymore, but they are the ones who brought you into this world.

    People ask me about you all the time.  They ask how you are doing and what you are going to do with your future.  I can’t answer those questions.  YOU HAVE TO ANSWER THOSE QUESTIONS!

    I was present recently when you talked about some things that you have been going through.  There were a lot of people around (Wireless LAN Professionals Conference 2018) and I was so excited to see you stand up and start talking.  I thought you were getting ready to have a breakthrough and let everyone know how awesome you can be… but then I was let down just as quickly as it started.  I’ll be honest, I was a little embarrassed.  People around me noticed how excited I got when I saw you and then they noticed how quickly I was let down.  You did a great job talking and the presentation was fine, but I couldn’t help but think it was a little fake.  It wasn’t who you really are.  I felt like you were just saying things you thought others wanted to hear.  People told me afterwards that they would have rather heard you talk about WHO YOU REALLY ARE, but instead you were “like all the rest of them.”  Love you or hate you, people just want you to BE YOU!

    I’ve been places and heard those other fish in the sea speak about themselves with confidence.  They keep wanting so badly to improve themselves, make themselves look good, and be accepted.  I can’t help but notice that it seems like you don’t care about everything that makes you who you are.  It seems you don’t remember where you came from, almost like you are trying to be someone else.  The world doesn’t need followers.  They (the others) all look the same to me.  I love you for who you were, who you are, and for the potential that you have.  Please don’t fall into the same line all of the others are in.  You were about being different.  Don’t lose sight of that!

    There are so many people out there that know your potential.  I know they might not always outwardly express their feelings, but they tell me.  They tell me to fight for you and tell me to be patient… and I will, but I can’t do it by myself.  I need your help.  I need you to be confident in yourself.  I need you to help me.  It can’t be a one way road like it has been.  Help me help you!

    I can’t speak for the future and what others feel, but I can speak for myself.  If I don’t see effort in this relationship, I don’t know that I can continue on.  I will still work beside you and be your friend, but I can’t guarantee that I will have the fight in me anymore.

    No matter what happens, I will always care about you.  I just hope that you can figure out who you really are.  You might already know but just haven’t told anyone yet, and that is ok, but just know that you are not helping anyone, including yourself.

    I am writing this letter to you, not because I want to break up, but because I care about you and your future.  I know you have great potential even though I don’t know exactly what the future looks like.  There are so many people pulling for you, I promise.  I hope my future has you in it.

    (Hopefully) Yours always,

    #MeruMitch

  • NETSCOUT AirCheck G2 v2.0

    We had the opportunity while visiting with NETSCOUT at Mobility Field Day 2 to get a sneak peek of the v2.0 firmware for the G2 (yes, firmware; no need to purchase new hardware).  Many of us were very excited to see some of the newly added features and it seems as though there is even more room to grow in the future.  What we have come to trust as one of our favorite go-to tools in the wifi toolbag has only gotten more powerful and useful.  I am not going to go into a deep dive of each of the features that Chris Hinsz showed us but I will share the links because he does a way better job explaining it (because he is the Product Manager of course).

    Notable features in the v2.0 release are iPerf, captive portal support/testing, interferer identification, and packet captures.  Also introduced was the NETSCOUT “Test Accessory” which will function as an iPerf server and can be placed anywhere there is a network connection with POE.

    The additional features that are being introduced show that this product is as versatile as ever and should increase the confidence of its user while deployed in the field.

    Here is the link to download the new v2.0 firmware.


    Video from MFD2 featuring Chris Hinsz, Product Manager at NETSCOUT


    Deep dive of AirCheck G2 v2.0 with Chris Hinsz

    https://www.youtube.com/watch?v=SCI6-iRzUaw&feature=youtu.be


    Video/webinar featuring Chris Hinsz of NETSCOUT and George Stefanick of Houston Methodist Hospital

    https://www.youtube.com/watch?v=UXVoW-rR2Rc&feature=youtu.be