Tag: LinkRunner
-
AirCheck G2 v3.0; Building on a Wifi Testing Stalwart
There are many good things continuing to happen with everyone’s favorite wifi troubleshooting tool from Netscout. The AirCheck G2 will have new firmware released this coming week on Tuesday, October 23. These new features expand on the tool’s already great feature set and should have any engineer feeling even more confident while troubleshooting. Version 3 is bringing many new features to your AirCheck. Upgrading the AirCheck G2 becomes easier to upgrade with over the air firmware upgrades. The only requirement to take advantage of this new feature is to have a current support contract. This is a great time saving new feature. Another feature new to the Aircheck will be the ability to share your profiles with other AirChecks within your organization. A profile can now be easily uploaded to Link-Live and shared among other AirChecks under your control. Adding to Link-Live’s new versatility is the ability to upload full AutoTest and Connectivity results, session files, screenshots, and packet captures. I pulled a packet capture for my iPhone after recently upgrading and saw the new option to upload to Link-Live. I simply selected the Link-Live feature, logged into Link-Live and found my pcap ready for analyzing. This builds on the ability to quickly transfer a pcap to a USB drive which can be connected directly to the AirCheck. Enhanced AP naming support has been added to get a better idea of which AP you are currently working with. APs from Cisco, Aruba, Huawei, Aerohive, and Extreme Networks are currently supported. Hopefully Fortinet will be added soon. I still rely heavily on my AirCheck G1 for identifying Meru/Fortinet APs due to it’s ability to read the AP ID information element. I continue to patiently wait… Improved packet captures allow the user to start and stop the packet capture on a specific device or channel. As mentioned previously, you can also now upload your packet capture to Link-Live for easy sharing of data with others in your organization. Another major enhancement is the ability to transfer certificates directly to the AirCheck using a USB device. I know this was a request in the past and the good people at Netscout listen to their customers! By now many of you may know that Netscout sold their “tools” to StoneCalibre, a private equity firm, on September 14. Netscout presented their future plans for the AirCheck and LinkRunner at Mobility Field Day 3 on the same day that the deal occurred but the formal announcement wasn’t made until the following Monday, September 17. Netscout was clearly aware of what was going to happen but still had a detailed roadmap for their products going forward. Their confidence seemed to be at an all time high and didn’t appear there was any reason for concern. I am still very confident in the product line going forward and am excited to see where this deal takes them. If you have a current support contract with Netscout, get ready to download the new firmware this coming Tuesday, October 23. There are many more features included that I didn’t mention in this post that will enhance the usability of an already great product. -
NETSCOUT LinkRunner G2; Part 2, Hittin The Switches
The LinkRunner G2 doesn’t disappoint when it comes to features. A few taps and you have the ability to gather detailed information about your network infrastructure without even opening an SSH session or a door to a network closet.
A quick tap of the NETSCOUT icon in the center of the bottom part of the home screen will open the LinkRunner G2 native testing functions. The one we are going to focus on in this post is AUTOTEST. When selecting AUTOTEST, the LRG2 will began gathering information based on it’s connection to your network whether it be via the 100/1000 BASE-X SFP or the copper 10/100/1000 LAN port.

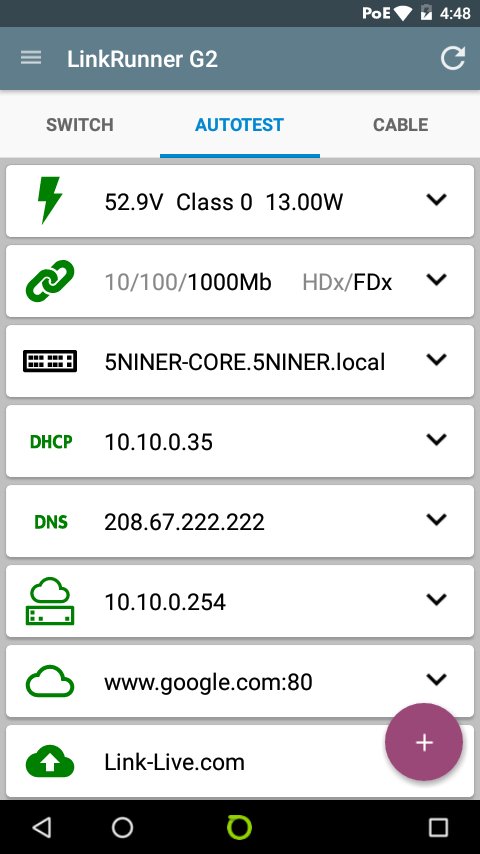
AUTOTEST gathers POE information, switchport speed and duplex, CDP/LLDP information, DHCP, DNS, gateway, internet, and connection to the Link Live website. Each test performed can be expanded to display more details of each test.
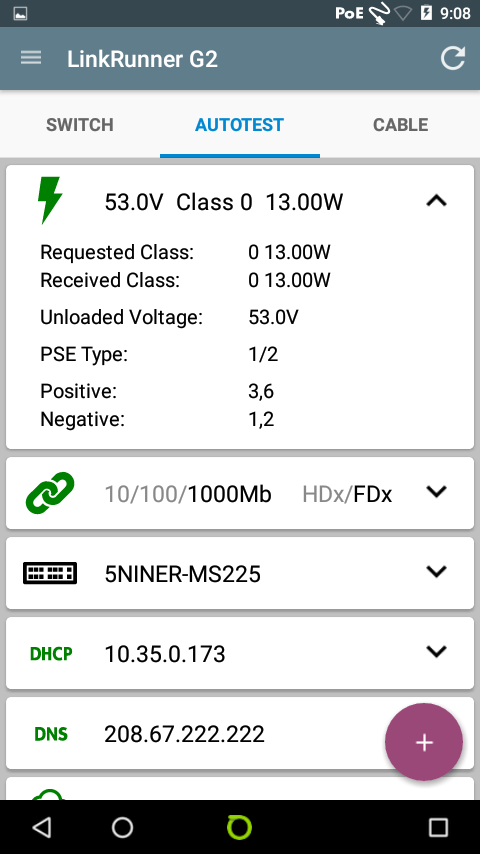
Expanding the POE test reveals the voltage and wattage present and also the POE class. In this example you will see that POE was available on the tested switchport with an available 53 volts and 13 watts.

The next part of AUTOTEST is port speed and duplex. This test will let you know whether the port you are connected to is 10/100/1000 Mbps and also whether the port is operating in a half or full duplex state.
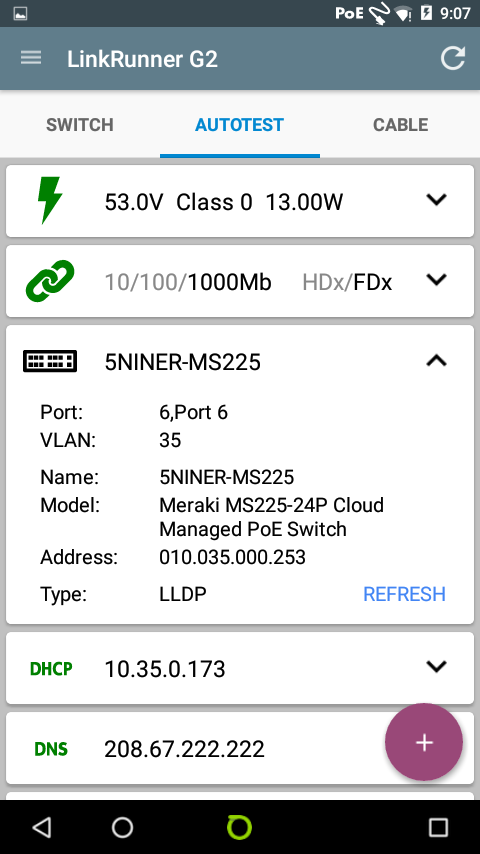
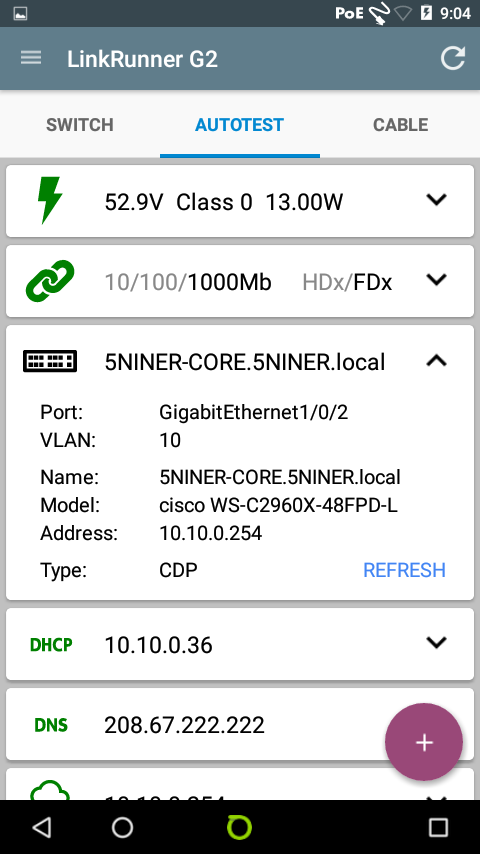
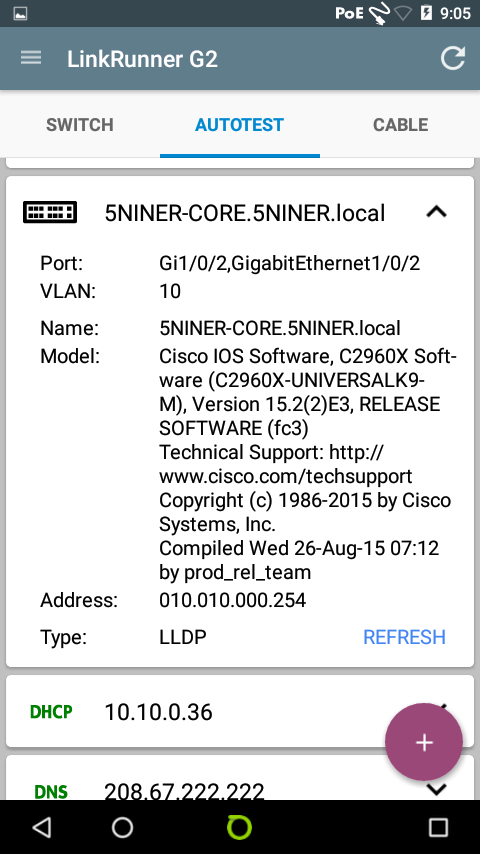
My favorite test in AUTOTEST is the CDP/LLDP test. This test reveals a lot of detailed information pertaining to the switch that you are connected to.


The first image shows the LLDP information collected from a Meraki MS225. The switch’s hostname, vlan membership, and switchport information is displayed. The second image is CDP information from a Cisco 2960X. The information that is given is very similar to that of the LLDP information from the Meraki. The third image is the same Cisco 2960X but this time displaying the LLDP information. You will notice in each example there is a “REFRESH” button that can be tapped. In the case of the Cisco 2960X tapping “REFRESH” toggles between CDP and LLDP. You will also notice in the LLDP information for the 2960X the IOS software version in addition to the hostname, switchport, vlan, and IP address. As you can see, this can be extremely helpful while troubleshooting, all without even being near the switch.
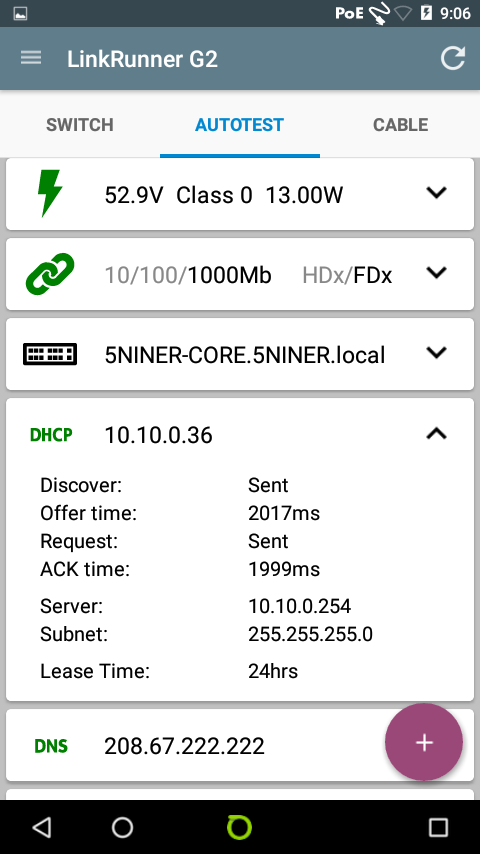
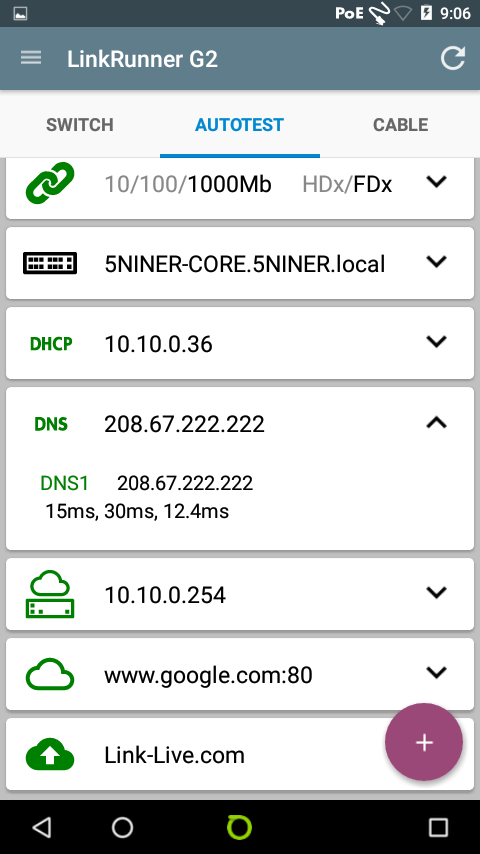
The next two images show DHCP and DNS information that is gathered. This test shows the DHCP offer time and ACK time as well as the DHCP server IP address and lease time. The DNS test shows the primary DNS server and lookup times. This information is obtained very quickly and eliminates the potential need to get other responsible parties involved for DHCP and or DNS details.


The last three pieces of information under AUTOTEST are gateway, internet connection, and Link Live accessibility. Under the gateway section local gateway information is given as well as the public IP address information and response times. The internet connection test, shown here as “www.google.com:80,” shows the IP address that it has resolved for the name as well as response times. Finally the last test shows that the information has been successfully uploaded to Link-Live.com.
AUTOTEST is a very detailed tool that quickly gets essential network connection information to the network engineer in very short order. The LinkRunner G2 brings all of the test results together into an easy to read screen. Annotations and pictures (remember this thing has a camera!) can also be included with these tests by simply tapping the purple circle with the plus sign, which can also be uploaded to Link Live. The AUTOTEST process takes roughly 10 seconds to complete which is a great advantage because traditionally all of this information would require several different tools and resources to get the job done.
Have I mentioned the LRG2 is CHARGING via POE all while these tests are being performed?
-
NETSCOUT LinkRunner G2; Part 1, Nuts and Bolts
This post will be the first of a few showcasing several of the great new features that NETSCOUT has given to us via their brand new LinkRunner G2.
Building on an already solid foundation, NETSCOUT has recently released the next variation of the LinkRunner rich with new features, all running on Android. Many of the rock solid testing features we have come to expect from NETSCOUT have been expanded in the LRG2.
The LinkRunner G2 is very close, if not exactly the same form factor as it’s brother the AirCheck G2. On the right hand side of the device you will find two volume buttons, a mini SD card slot, and a micro USB connection. Flipping the LRG2 over, you will see that there is an LED flash(light) and also a camera.
The top of the device has one SFP slot which will accommodate
 most any SFP module, a copper 10/100/1000 Mbps ethernet port and another USB port which can be outfitted with a wireless USB device. At the time of this post, the only wireless device that works with the unit is a single band Edimax adapter. There is no integrated wireless adapter. The power button is located in the same position as the AirCheck G2’s power button. Charging the unit is done from the same spot as the AirCheck G2 AND via POE over the wired ethernet port on the top of the unit.
When you first fire up the device the user interface is very familiar to anyone who uses an Android device. The screen and menus are laid out very similar to an Android phone. The bottom of the screen has the familiar NETSCOUT logo which is a button that
 opens the LinkRunner’s native testing features. You will also notice that there is an App Store which is populated with a handful of familiar apps. I’ve been told that if there is an App that is not in the store, you can request it be added as long as it is free. Some of the familiar apps you will find are Microsoft Office, Wifi Analyzer, Meraki, UniFi, Aruba Utilities, and AirDroid to name a few.
The device is targeted to field support staff who can use the unit to receive trouble tickets via email, web, etc and a then perform several different troubleshooting steps, gather data, and ultimately upload the results of the tests to LinkLive for further analysis.
When tapping the NETSCOUT icon in the center of the bottom of the screen, you open the LinkRunner menu.
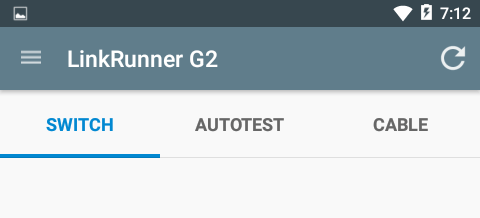
You are presented with three options near the top of the screen when the LinkRunner menu opens; Switch, AutoTest, and Cable. Selecting “Switch” will give you information such as the port the device is connected to, the VLAN tag, port speed and duplex, and POE information if it is available. “AutoTest” takes all of the information from the “Switch” menu and expands on it. The information in “AutoTest” is similar to what you would expect from a LinkSprinter except much more detail. I will dive a bit deeper into these tests in future posts. The “Cable” menu performs a continuity wire map test on each pin as well as a TDR on each pair. The wire map is accomplished using the included WireView Wiremapper. The TDR function is a great addition which will help determine distance to faults.
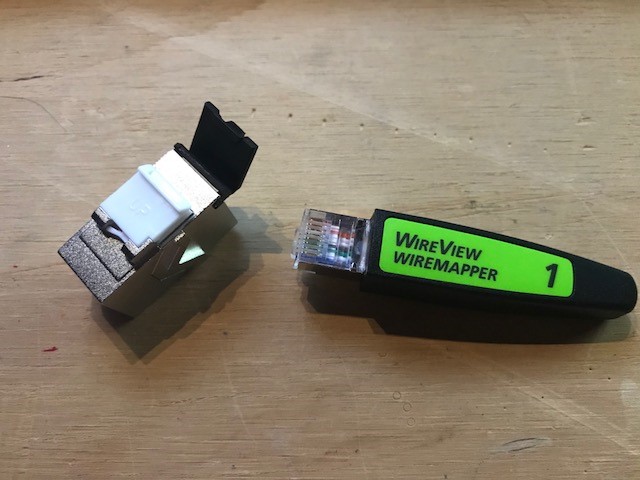
This is a very high level overview of a select few features and tests that the LinkRunner G2 can perform. As noted earlier, there will be future posts that go into greater detail of some of those features. The LinkRunner G2 will be a welcome addition to any network engineer’s toolbag with it’s Android OS which is highly versatile as we already know. Being able to collect trouble call information via a web browser, running tests, taking pictures of locations or faults, and possibly doing configs of network equipment via an SSH/Telnet client make this device a true one stop solution for any engineer. I look forward to further enhancements and developments to the LinkRunner G2 which will make it an even more versatile tool.
More to come soon…